The Snap That Ended My Relationship with Rubbermaid
It happened on March 7, 2026, a typical late-winter morning in suburban Minneapolis where the thermometer was doing its best impression of a frozen popsicle. I was out in the driveway, trying to find the bag of ice melt buried under a light dusting of snow. When I grabbed the handle of the large plastic tote sitting by the garage door, I didn't get the bag. I got a sharp, brittle snap. The lid literally shattered in my hand like a cheap cracker.
Standing there with a piece of gray polypropylene in my glove, I performed a quick root cause analysis of my driveway. It looked like a graveyard for sun-bleached Tupperware. I had four of these totes, all varying degrees of warped, cracked, or sporting lids that no longer 'clicked.' As an IT project manager, I hate legacy hardware that fails at the first sign of a stress test. I realized then that I wasn't just storing my lawn tools; I was managing a slow-motion landfill in my own front yard. I needed a vertical storage solution that could actually survive a Minnesota winter without becoming brittle enough to disintegrate if a squirrel sneezed on it.
I retreated to my garage workshop—well, the half of the two-car garage my wife hasn't reclaimed for her SUV—and started browsing the my-shed-plans library. I needed something with a small footprint that could tuck into the narrow path between my garage and the property line. I wasn't looking for a guest house; I wanted a 4'x2'x6' high-performance locker. Something that looked like it belonged in a high-end backyard rather than a clearance aisle.
The Math of Permanent Storage
Before I started sawdust production, I had to justify the 'system upgrade' to my internal finance department (my wife). We’d spent probably two hundred dollars on various plastic bins over the last three years. They are the 'subscriptions' of the storage world—you keep paying for them because they keep expiring. Building a cedar shed is more like a capital expenditure. It’s a one-time cost for a ten-year-plus lifecycle.
I broke down the hardware and material requirements for a 48-cubic-foot vertical shed. Here is how the project scope looked on paper:
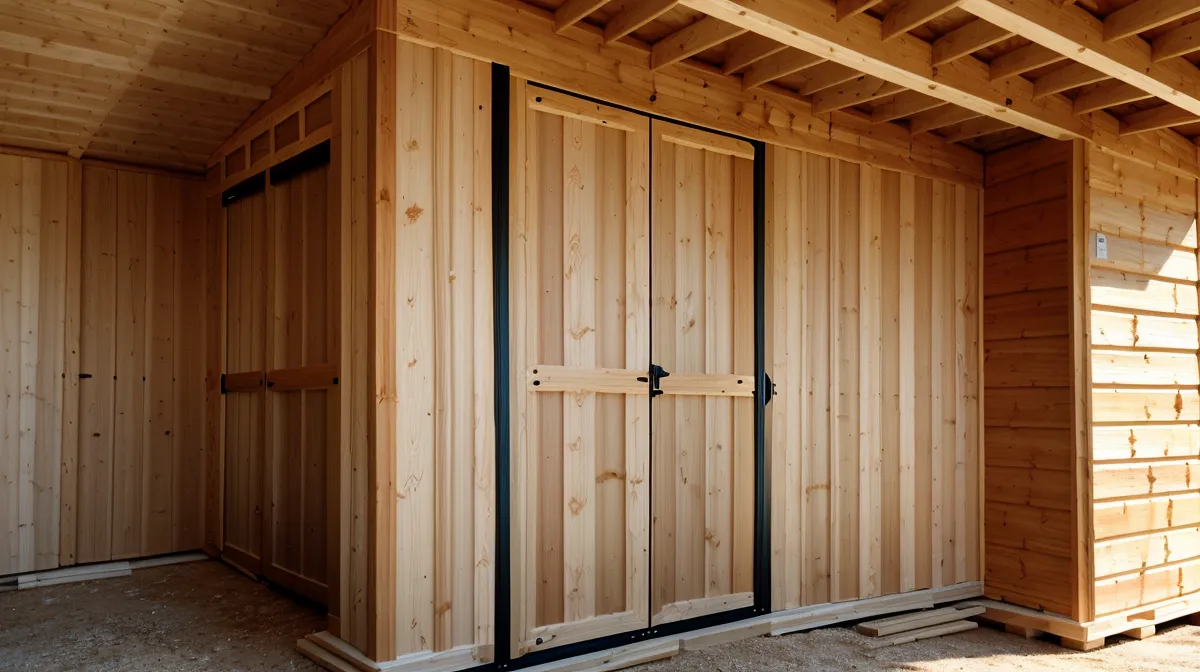
- Cedar 1x6 tongue-and-groove boards: I needed 28 of these to cover the three sides and the double doors.
- Material Cost: At my local lumber yard, Grade B cedar was running $14 per board, totaling $392.
- Framing and Hardware: I budgeted $149 for 12 pressure-treated 2x4s ($84) and heavy-duty galvanized hinges and a latch ($65).
- Total Investment: $541.
It’s significantly more than a $30 tote from a big-box store, but the volume is equivalent to about six of those large bins, and the 'uptime' is significantly higher. Plus, Western Red Cedar contains natural oils that act as preservatives to resist decay and insect attack, which is basically built-in antivirus for your outdoor structures.
The Sensory Experience of Sawdust
By March 21, the weather had cleared enough that I could keep the garage door open without my breath frosting over my safety glasses. This was the first project where I really got to use my table saw for something more complex than ripping down plywood for a lopsided shelf. As I started milling the framing, the sharp, citrusy scent of fresh-cut cedar filled the garage, momentarily masking the smell of old lawnmower gas and wet concrete that usually defines the space. It’s a smell that makes you feel like a much better woodworker than you actually are.
I’ve written before about the Minnesota winter survival guide for unheated garage woodshops, and honestly, the cedar scent is the best morale booster during the spring thaw. The build itself is methodical. You build the base, frame the walls, and then the magic happens: clicking the tongue-and-groove cedar planks together. It’s like LEGOs for adults who want to smell like a spa.
The PM Error: A Deployment Failure
Of course, no project of mine goes live without a major bug. In the IT world, we call it a deployment error. In the woodshop, we call it 'not measuring the swing clearance.' I had spent hours meticulously building the double doors in my garage. I measured the opening, accounted for the 1/8th inch gap for expansion, and felt like a genius.
On a Sunday morning, I dragged the finished doors out to the shed frame. I mounted the heavy-duty hinges and swung the first door open. Thud. I had measured the door opening perfectly, but I had completely forgotten to account for the thickness of the cedar siding on the house and the way the door hinges would pivot. The door couldn't open past 45 degrees because it was hitting the house. I stood over a pile of sawdust, realizing I cut my last expensive 1x6 exactly two inches short because I forgot to 'measure twice' during the emergency rebuild of that door frame. I had to spend the rest of the afternoon backing out screws and recalculating the hinge offset. It was a classic case of focusing on the component while ignoring the environment it lives in.
The Airflow Secret (What the Plans Don't Tell You)
Here is the contrarian truth about cedar sheds that most 'weekend warrior' YouTube channels ignore: Cedar storage sheds actually invite more moisture damage than plastic totes unless you incorporate specific interior airflow gaps. Most people build these things as airtight as possible to keep the bugs out. However, when you put a damp lawnmower or a salt-covered shovel into a sealed wooden box, you’re creating a humidor.
I learned this the hard way with a smaller tool chest I built last year. To fix this, I didn't push the tongue-and-groove boards completely tight on the back wall. I left a 1/16th-inch gap between every third board. From the outside, you can't see it. But it allows the relative humidity inside the shed to equalize with the outside air. Without that, you're just building a very expensive mold farm. It’s the same logic we use for server rack cooling—you need intake and exhaust, or the hardware fries. In this case, your tools rust.
Observations from the Workshop Floor
- A nominal 2x4 board actually measures 1.5 inches by 3.5 inches. If you follow a plan that assumes a full 2-inch width, your entire frame will be 'off-by-one' in the worst way possible.
- Stainless steel or galvanized fasteners are non-negotiable. Cedar has tannins that react with plain steel, leaving black streaks that look like the shed is crying ink.
- If you’re working in a garage, buy a shop vac with a HEPA filter. Cedar dust is fine, persistent, and will find its way into your laundry room if you aren't careful.
The Final Review
By April 11, the shed was fully assembled and finished with a light coat of clear UV-protectant oil. It stands six feet tall, hiding my lawnmower, four bags of driveway salt, and all the garden tools that used to clutter the corner of the garage. It doesn't just store stuff; it declutters the visual space of the driveway. The garage finally looks like a professional workshop instead of a plastic storage locker.
Looking back at the cracked plastic lid that started this, the $541 investment feels justified. I’ve spent more on software licenses that I used twice. This shed is a physical asset that actually adds value to the house. If you're tired of the 'plastic cycle,' I'd highly recommend looking into some professional designs. I actually detailed some of my earlier struggles with larger structures in my post about why I risked my marriage (and fingers) on a DIY 8x12 shed, but for a weekend project, this vertical cedar locker is much more manageable.
My wife actually let me put this one where guests can see it, which is the highest praise a hobbyist woodworker in Minneapolis can hope for. No cracks, no warping, and every time I open it to grab the lawnmower, I get that hit of cedar scent that reminds me I’m a guy who builds things, even if I still cut the occasional board two inches short.